Our mail server has a very powerful and flexible system to manage inbound E-mail. This article will provide a few examples of what you can do, the possibilties go far beyond what we can possibly cover. It would be a good idea to look over the available options at each step to gain an idea of the types of filters you could create, and how they might be of benefit to you.
- Login and Navigate to the Filter Settings
- Block E-mail from an Address
- Filter an E-mail Into a Folder
- Change Priority to High if from Trusted Sender
- Reroute to a Different Address if ...
-
Log into your E-mail account by visiting the webmail portal located at https://ShastaEmail.com, then fill in your E-mail address and password, and click Login.

-
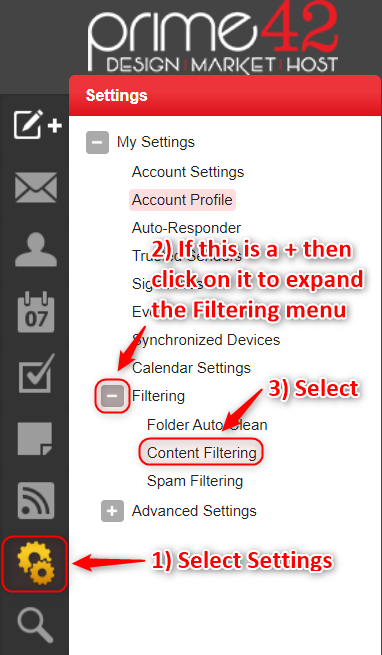
- On the left side is a vertical row of icons. This is the top level of navigation. Select the two gears for Settings.
- If the section for Filtering is not already expanded, click on the plus sign to expand it.
- Select Content Filtering.
-
The screenshot below shows any available filters. If you have not yet created any, then there will not be much to see except the New, Edit, and Delete buttons at the top. In this image there is a place holder rule to allow you to see what the rule list looks like.
In the header of the rule list is a check box that will select all of the rules. About the only time this becomes useful is if you wanted to delete all of your rules at one time. Each rule can be selected or deselected individually with the checkbox in front of the rule. The three blue buttons at the top are New, Edit, and Delete. To edit a rule you select the rule, but you must only select one, then click on the Edit button. To delete a rule or multiple rules, select what you want to delete and click the Delete button. If you have more than one rule, you will see arrows in the Move column. This allows you to change the order of the rules. Rule order matters, because the filter engine will start at the top of the list and work it's way down. On the first rule that matches, it will perform the action and stop processing rules. Finally, the New button was saved for last because it is not only self explanatory, but now we can transition into the examples by saying that to create any new rule, such as the examples to follow, you start by clicking the New button. This step will be assumed to have already been done in the examples below.

Filter Rule Examples:
Block E-mail from an Address
- Select the checkbox in front of From specific addresses, then click the blue Next button in the top header of the section.
- There are a few of things to note on this intermediate step. The Enable wildcards in search strings checkbox, if selected, allows you to use the "*" character to signify any number of characters as a wildcard. For example: *@domain*.com would match bob@domain.com, sally@domainname.com, and even ls4093fl@domainWhatEver.com. The selection also allows you to use "?" as a wildcard for any single character. For example, john@sm?th.com would match john@smith.com and john@smyth.com and even john@sm8th.com but not john@smythe.com. Also, the From specific addresses (one per line) drop-down box allows you to select if the addresses you enter should match, or if they must not match. This lets you create a rule that always activates with certain addresses being an exception to the rule. You may enter more than one E-mail address in the entry box, but they should be one address per line, so hit the Enter key on your keyboard between entries. Finally, when done click the blue Next button in the top header of the section.
- Now give the rule a name, and because this example is to block an address, put a check mark in front of Delete Message, then click Save.
Filter an E-mail Into a Folder
In order to create this rule, the folder must already exist in your mailbox. If you need to create a new folder, from the main inbox screen, right click on the Inbox and select New Folder. If you want the folder to be a subfolder of an existing folder, you can select where to create the new folder from the drop down list above where you enter the folder name.
- Look over the available options and select what should trigger your message to be placed in a different folder. Common reasons for such filtering might include who it is from, or content that might exist in the subject line, or even if it is from a Trusted Sender. The latter example is also an example of an option what does not require an intermediate step to creating the filter.
- If you selected an option in the first step that requires more information, there might be an intermediate step to enter that information. Otherwise, you will end up on the final step of rule creation.
- Now give the rule a name, and because this example is to automatically filter messages into a folder, put a check mark in front of Move message, and select the folder from the drop-down list that follows it. Finally, click Save.
Change Priority to High if from Trusted Sender
This is a very specific rule. This means that it will be very straightforward to follow this example.
- Select the checkbox in front of From trusted senders, then click the blue Next button in the top header of the section.
- Now give the rule a name, select the checkbox in front of Set Priority, and select High from the drop-down list that follows it. Finally, click Save.
Reroute to a Different Address if ...
This rule will send filtered messages to a different address and not deliver it to you. If you wish to maintain a copy in addition to the one you send elsewhere, then in the final step replace Reroute message with Copy message.
- Look over the available options and select what should trigger your message to be rerouted. Common reasons for such filtering might include who it is from, or content that might exist in the subject line, or even if the message has an attachment with a specific filename.
- If you selected an option in the first step that requires more information, there might be an intermediate step to enter that information. Otherwise, you will end up on the final step of rule creation.
- Now give the rule a name, and because this example is to send the message to a different address, put a check mark in front of Reroute message, and type the address to send the message to in the box behind it. Finally, click Save.
